In this short, sharp explainer, Painless360 walks newcomers through the often-overlooked SYSTEM menu on an EdgeTX-powered radio. If you’ve recently migrated from FrSky, Futaba or Spektrum—or you’re brand new to radio transmitters—this is the part of the radio that quietly does the housekeeping so your model setups can hum along. Most of the time you’ll live in the Model menu, but the System menu is the workshop behind the scenes. Here’s a concise, slightly opinionated report on everything Painless360 covers (plus a few practical tips I’d shout across the bench).
Quick orientation: why the System menu exists
Think of the Model menu as the cockpit and the System menu as the avionics bay. The Model menu configures per-model mixes, inputs, outputs, curves and trims. The System menu contains system-wide tools, preferences and hardware diagnostics that affect the radio itself—not any single model.
How to navigate it (don’t be the person who pokes randomly)
- Top icons: tap or select the icons at the top of the screen to jump between tabs.
- Hardware buttons: the backwards/forwards keys scroll through pages. If you only have one key, a long press moves one direction; a short press moves the other.
- Colour touchscreen radios: treat it like a phone—tap to select.
Tab-by-tab: what lives in the System menu
Painless360 runs through the System menu tabs in order. Below is a compact summary so you know which tab to visit when your radio misbehaves—or when you need to bind a receiver.
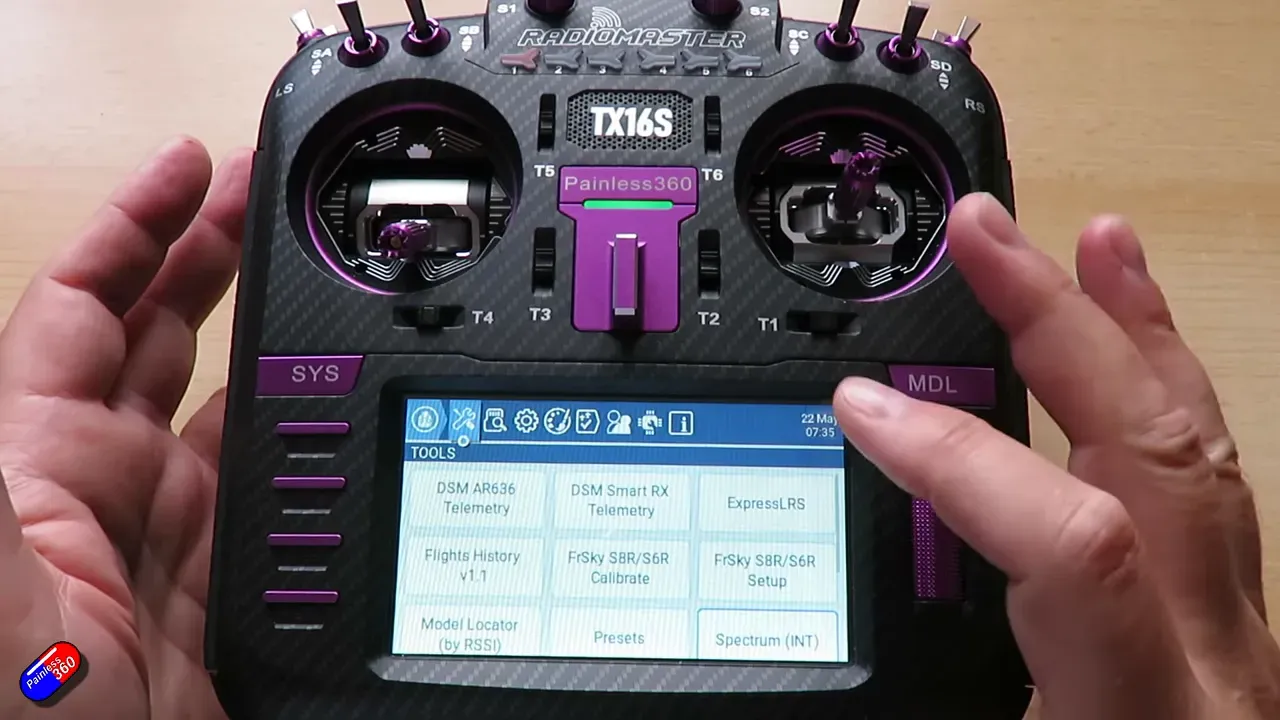
Tools
This is where helper apps and utilities live—anything installed on the radio’s SD card. Expect entries for:
- ExpressLRS (ELRS) utilities: bind receivers, change link speeds and modes. If ELRS isn't configured you’ll get a clearer warning now—better than the old blank screen.
- TBS Agent Lite: the Crossfire helper tool (if you run Crossfire).
- Yappu Config: telemetry widget configuration (useful with ArduPilot setups).
In short: go here when you want to bind a receiver, tweak your RF link, or run module-specific utilities.
SD Card
Browse what’s on your SD card: images, widgets, sounds (.wav files), scripts and tools. Painless360 reminds us this is useful because where files live can matter—especially custom sounds, splash screens and widgets.
Radio Setup
This is the meat of everyday system-level preferences:
- Date & time
- Variometer sound settings
- Backlight and screen timeout
- Haptics (where the radio buzzes and how it behaves)
- Power-on splash screen and startup sound durations
- Owner ID, location and language
Set these correctly for your locale and preferences. Painless360 points out these are the typical items most users might want to tweak if they’re picky about volume, haptics or the splash-screen show-off time.
Themes
Change the look of the UI. There are many ready-made themes (colour palettes) and you can create custom themes if you want full control. Painless360 sticks with the default blue, but you do you.
Global Functions
Rarely needed. Global functions operate at radio-level rather than per-model. Painless360 admits he’s gone years without using them in EdgeTX/OpenTX, but they are occasionally handy for advanced users who want radio-wide shortcuts or macros.
Trainer
Set up master/slave radio control here. The trainer menu supports:
- Wired trainer cables (typical on older radios)
- Wireless trainer links (if the hardware supports it)
- Giving or taking control during instruction
- Multi-operator setups (eg. one operator drives a tank, a second operates a turret)
Hardware
Calibrate batteries, set nominal voltage ranges, and configure internal and external RF hardware. If your battery readings are wrong, this is where you fix them.
Info
Everything you’ve been searching Google for: EdgeTX version, module versions, receiver firmware and other installed versions. If you can’t remember what’s on the radio, this pane tells you.
Practical workflows Painless360 highlights
There are two workflows you’ll inevitably use in the System menu:
- Binding receivers (ExpressLRS or Crossfire) — Tools → ExpressLRS or TBS Agent Lite. This is the most common reason to use the System menu.
- Checking software versions and installed tools — Info → confirm your EdgeTX and module firmware before troubleshooting or updating.
Everything else—model mixes, curves, inputs and outputs—lives in the Model menu. Painless360’s core point: “if the radio is set up and working you’ll rarely need to come into System.” But when things go wrong, the System menu is where you fix them.
Troubleshooting & tips (bench-proven)
- If ELRS shows “not configured,” don’t panic—open Tools → ExpressLRS and bind the receiver. The new warning is deliberate and helpful.
- Use SD Card browser to confirm custom sounds or widgets are placed correctly. Missing .wav files = silent annoyances.
- Always check the Info tab before updating firmwares—note EdgeTX version and module firmware to avoid mismatches.
- Calibrate battery under Hardware if you see inconsistent telemetry voltages. It’s quick and saves panic mid-flight.
- If you teach someone, test the Trainer link on the bench first—cable or wireless—so you don’t give away control mid-flight.
Step-by-step: quick ELRS bind (summary)
- Open System → Tools → ExpressLRS.
- If your radio shows “not configured,” follow the on-screen wizard to set the module parameters.
- Put your receiver into bind mode (hardware button or F/S pad depending on receiver).
- From the ExpressLRS tool, initiate binding. Wait for telemetry/LED confirmation.
- Confirm control via the Model menu (safe bench test with props removed).
Critical analysis — what Painless360 didn’t say (but implied)
The System menu is intentionally low-friction: it’s not designed for daily fiddling. That’s both its strength and its weakness. On the one hand, keeping per-model settings and system settings separated prevents accidental cross-model breakage. On the other hand, beginners can be confused about where to look for things—“Why isn’t my ELRS bind option in the Model menu?” Because it’s a system-level tool.
Pro tip: learn the difference now. You’ll avoid the “why won’t my receiver bind?” rabbit hole and you’ll understand why the Model menu is the place for flight configuration while System is for radio housekeeping.
FAQ
Q: When should I use the System menu instead of the Model menu?
A: Use System for radio-wide settings (firmware info, tools, themes, battery calibration, trainer setup). Use Model for flight-specific configuration (mixes, servos, endpoints, inputs, outputs).
Q: I can’t find the ExpressLRS bind option—where is it?
A: System → Tools → ExpressLRS. If the entry says “not configured,” run it and follow the on-screen prompts and your receiver’s bind routine.
Q: Can I delete the default themes or widgets from the System menu?
A: You can change themes and add/remove widgets from the SD card. Use the SD Card browser in System to confirm files and delete or replace them as needed.
Q: Why are my telemetry battery voltages wrong?
A: Open System → Hardware and calibrate the battery thresholds. Misconfigured battery settings are the usual cause of incorrect telemetry readings.
Q: How often do I need to check the Info panel?
A: Before any firmware update or when troubleshooting radios/modules—checking the Info panel prevents incompatible updates and gives you a quick snapshot of your installed versions.
Closing thoughts
Painless360’s message is pragmatic: the SYSTEM menu is powerful but unglamorous. You’ll probably only visit it to bind receivers, check firmware, tweak battery calibration, or configure trainer links. Learn the navigation, know where Tools and Info live, and you’ll save a lot of head-scratching later.
And if you want to go deeper: follow Painless360’s EdgeTX for Beginners playlist for hands-on demos. He walks you through the exact screens and options—perfect for bench sessions.
Happy flying—and don’t forget to remove the props before testing binds on the bench.
This article was created from the video What all of the pieces are for in the SYSTEM menu (EdgeTX for Beginners 2025).