RunCam’s WiFiLink v2 video receiver arrives with factory firmware that’s already out of date. Flashing the latest RubyFPV firmware isn’t optional—it’s mandatory if you want decent performance and fewer headaches. This guide cuts through the fog and shows how to flash RubyFPV reliably, then get your setup humming.
Why Bother Updating Your WiFiLink Firmware?
RunCam ships WiFiLink v2 devices with the freshest firmware available at manufacturing time, but OpenIPC—the open-source project powering the firmware—moves fast. The firmware on your device is already behind the curve. According to developers and community feedback, the latest RubyFPV firmware offers noticeably better performance.
RubyFPV is the recommended firmware by RunCam and likely what they ship on newer devices. It boasts a mature interface that simplifies use, unlike some other OpenIPC alternatives that offer better performance but demand complex configuration and tuning.
If you want to experiment with other firmware, this guide still applies—you just swap out the firmware file.
Gathering the Tools: Drivers, Firmware, and Software
Before flashing, you need to download a couple of essential files:
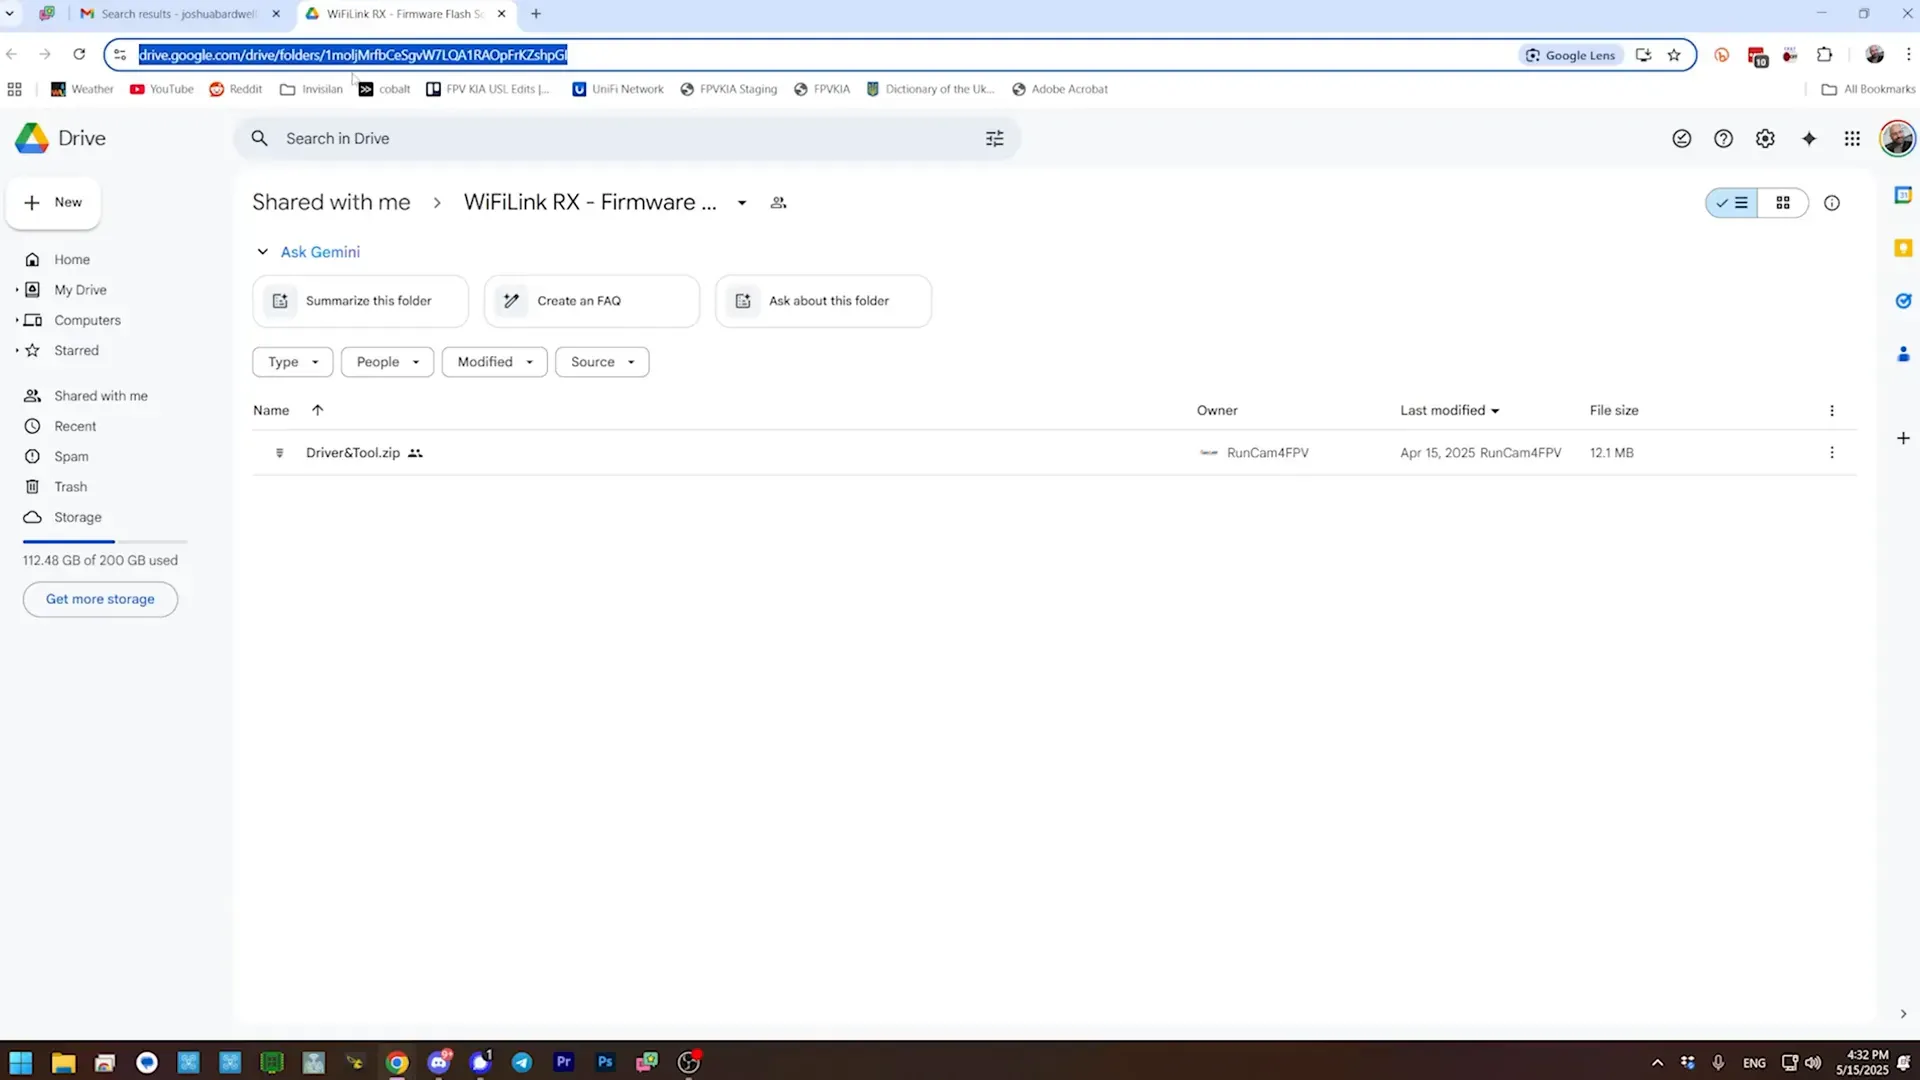
- Driver and tool archive from RunCam’s Google Drive: This contains the drivers and flashing tool needed for your Windows PC. (Sorry macOS users, this tutorial sticks to Windows.)
- RubyFPV firmware image: Download the latest version (currently v11.1) from the official RubyFPV downloads page. Make sure to grab the full RunCam eMax VRX image.
Extract both ZIP files to your hard drive. The driver and tool ZIP contains a driver assistant and the RKDevTool for flashing.
Installing the Driver and Preparing to Flash
Run the driver assistant executable from the extracted folder to install the necessary USB drivers. This step is crucial for your PC to recognize the WiFiLink device in flashing mode.
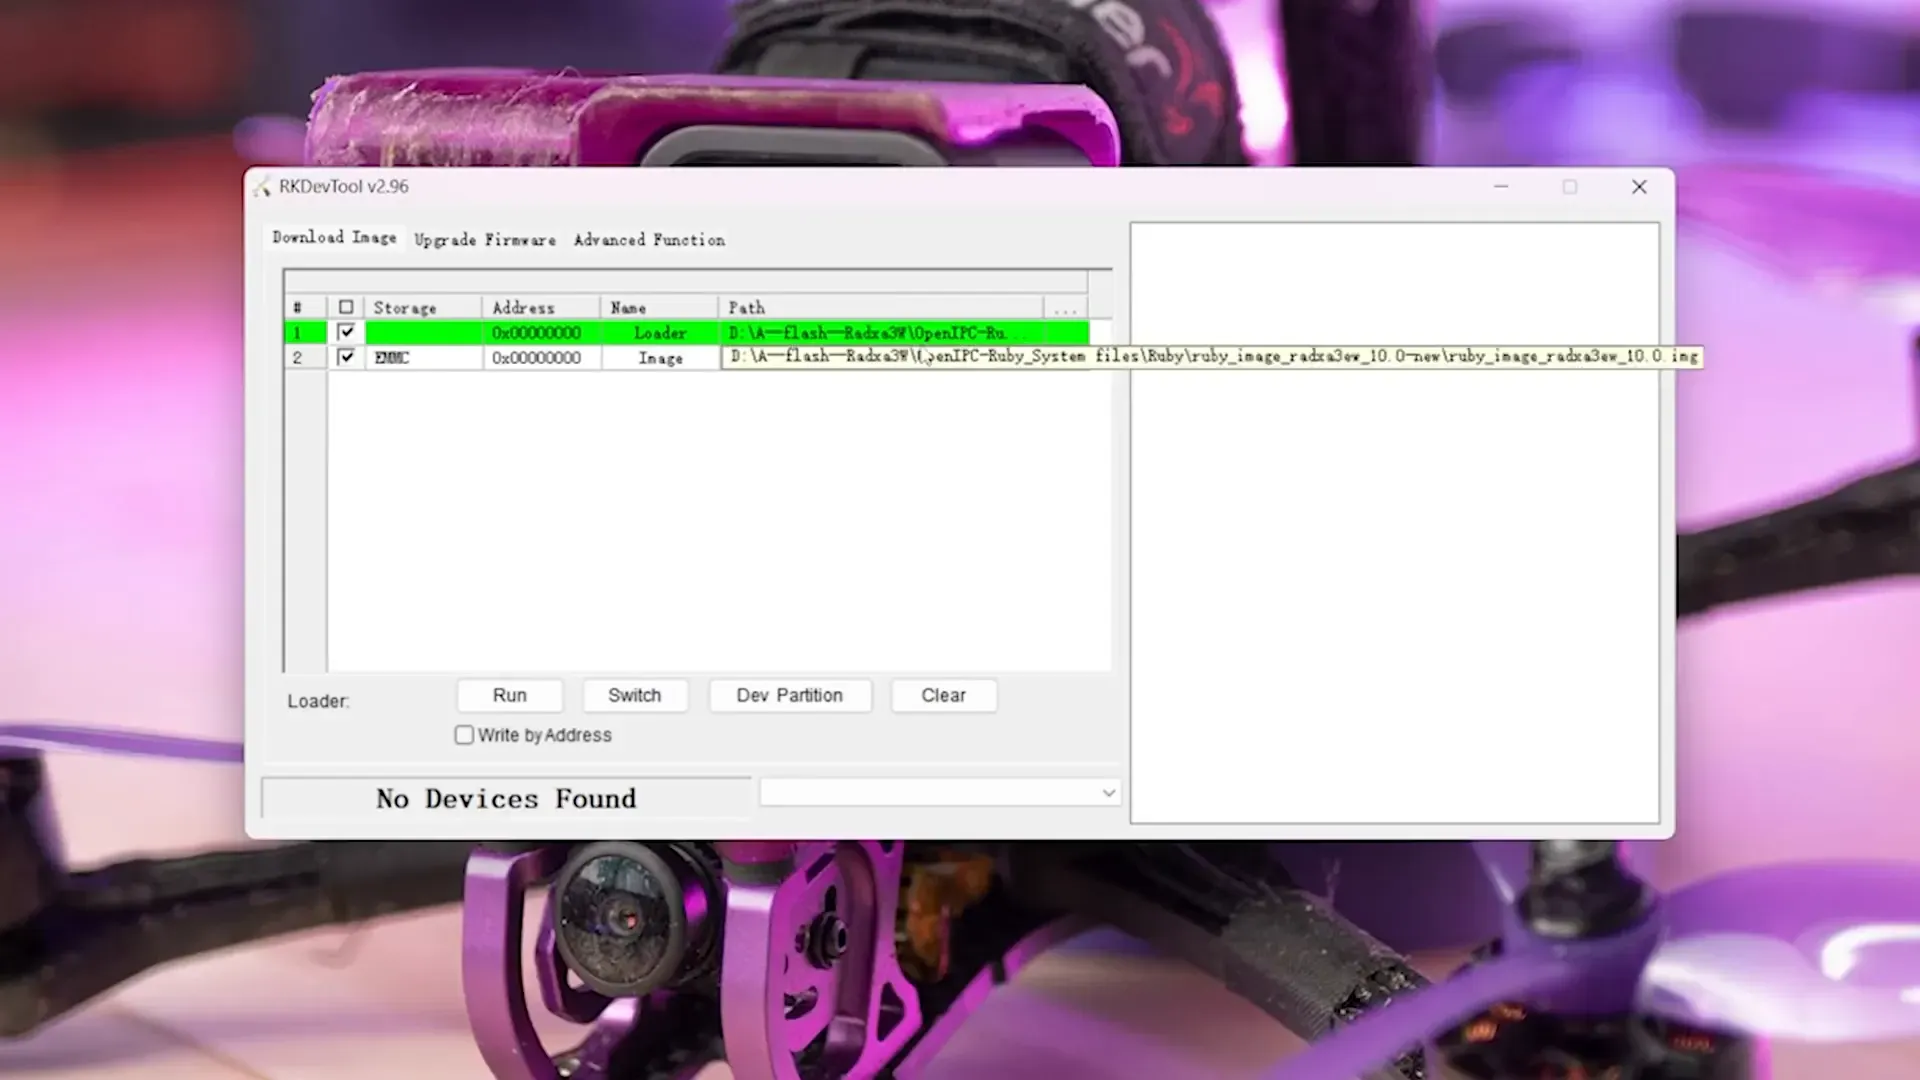
After installing the driver, launch RKDevTool.exe from the arcade dev tool folder. Expect a security warning; ignore it and proceed. The tool interface requires two files to be loaded:
- Loader file: Select the RK3566 SPI loader from the driver and tool folder.
- Firmware image: Select the extracted RubyFPV .img file, not the ZIP archive.
Loading the ZIP instead of the .img is a common rookie mistake. The tool might let you select the ZIP but will fail silently during flashing.
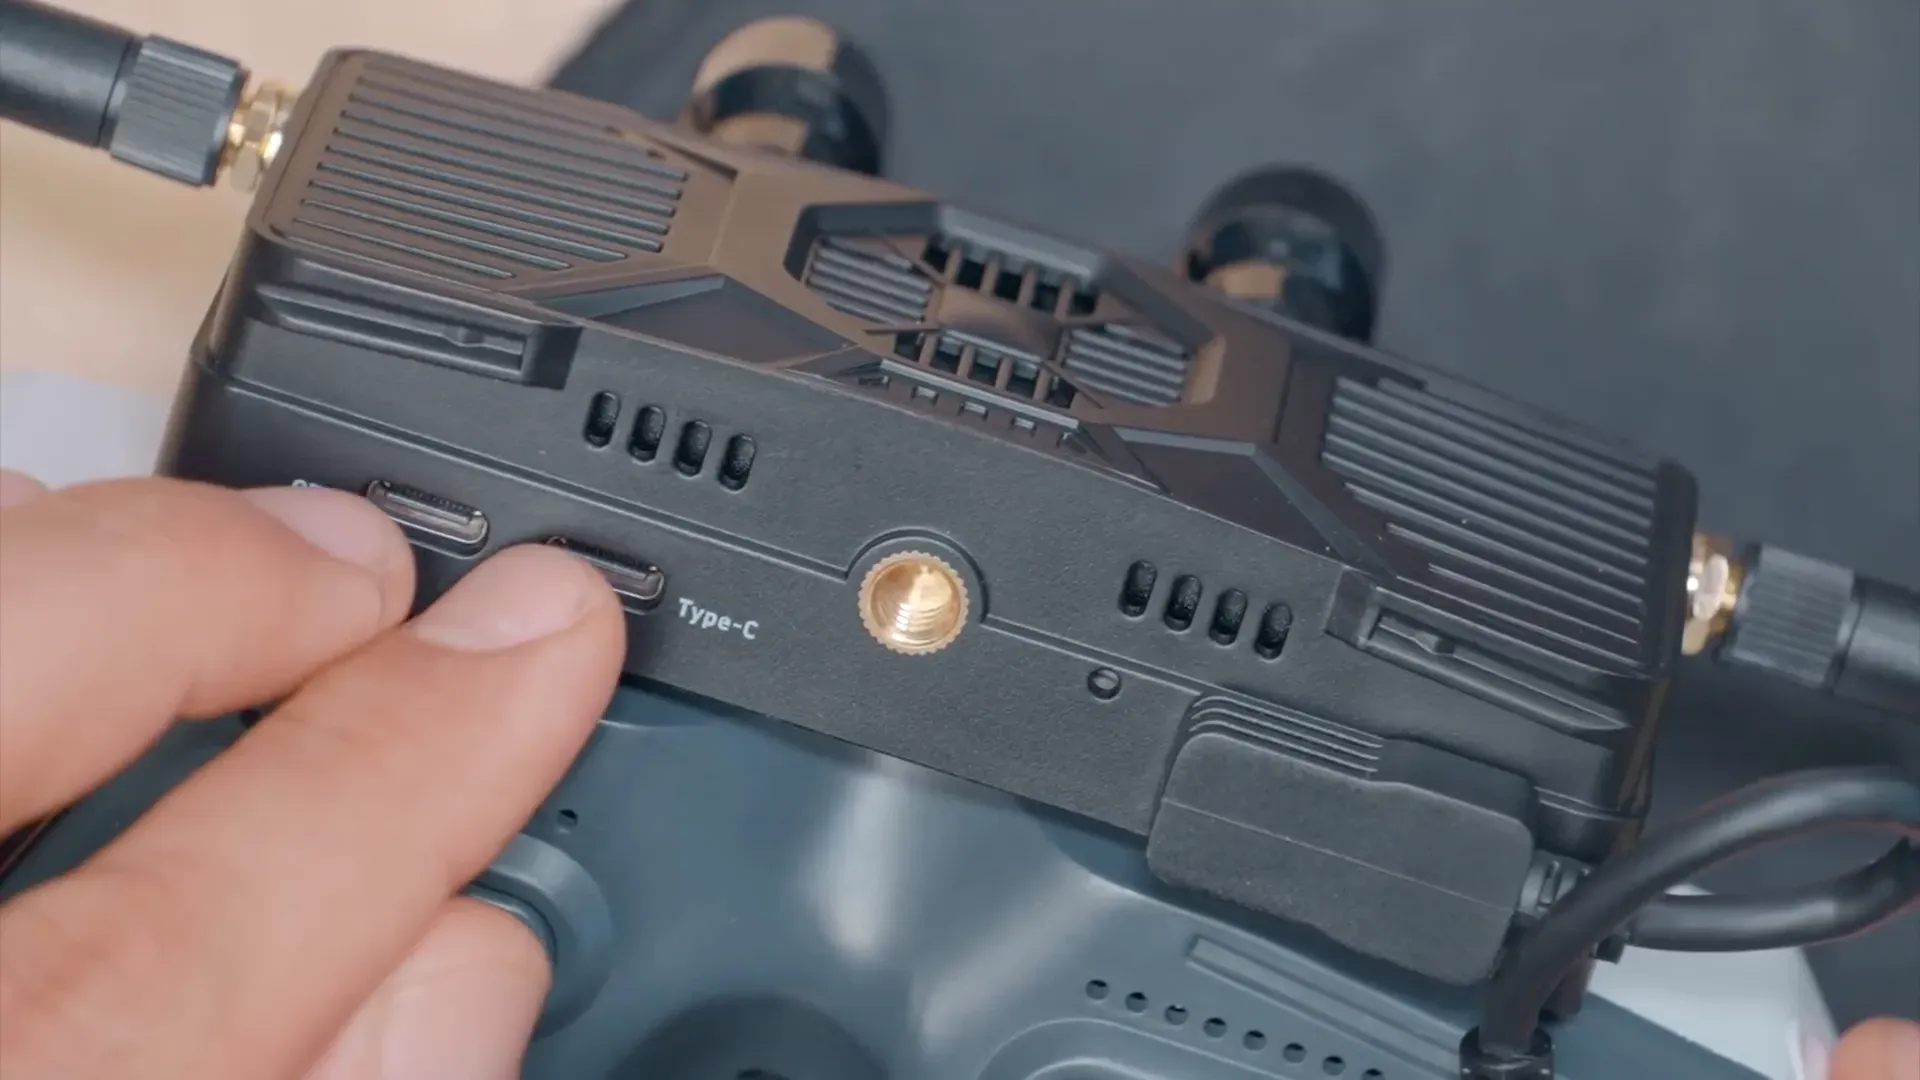
Getting the WiFiLink into Flashing Mode: Timing is Everything
Entering flashing mode (called MASKROM or DFU mode) on the WiFiLink requires precise timing:
- Prepare a power source, such as a battery.
- Press and hold the button on the WiFiLink.
- While holding the button, apply power.
- After powering, count two seconds.
- Release the button.
- Quickly plug the USB cable into the Type-C port (not the OTG port).
The timing is finicky. Hold the button too long, or wait too long to plug in USB, and flashing mode won’t activate. The RKDevTool should then show one MASKROM device, confirming you’re in flashing mode.
Flashing RubyFPV: Press Run and Pray
Back in RKDevTool, select “Right by address” and hit Run to start flashing. The process overwrites the internal memory (eMMC) and erases your current configuration. If you’ve customised settings, back them up first.
Flashing takes a couple of minutes. Once complete, power cycle the device and prepare for the first boot. Expect some internal updates before the firmware settles.

Why Flash at All? The SD Card Trick
You don’t strictly have to flash the internal memory. OpenIPC firmware can boot from an SD card image, letting you test different firmware without wiping your eMMC config.
RunCam disables this SD card boot by default, but once you flash RubyFPV (or other non-RunCam firmware), the device supports SD card booting again. This means you can:
- Keep your stable config in eMMC.
- Test new firmware from an SD card.
- Remove the SD card to revert instantly.
It’s a neat trick for firmware experimentation without risking your working setup.
RubyFPV on the Video Transmitter: OTA Updates Make Life Easier
Once the ground station runs RubyFPV, update your RunCam WiFiLink video transmitter. Luckily, RunCam ships the transmitter with RubyFPV pre-installed.
RubyFPV supports over-the-air (OTA) updates for the transmitter. Connect to the transmitter, and it offers a firmware push automatically. No need for SD cards or button combos—just accept and wait.
Initial Setup and Optimisation: Connecting Your Drone
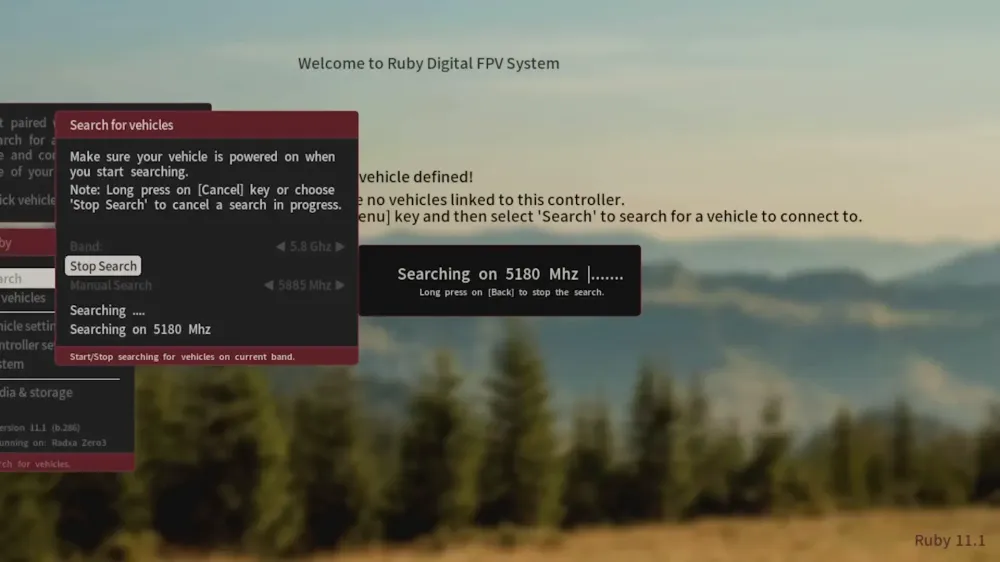
After flashing, the ground station forgets previous drone pairings. Use the joystick to navigate the RubyFPV interface:
- Go to Search and start scanning for your vehicle.
- When found, select Connect for control.
RubyFPV does not use the old GS.key file system. It uses a different method to authenticate and connect securely.

Setting Up Betaflight OSD with RubyFPV
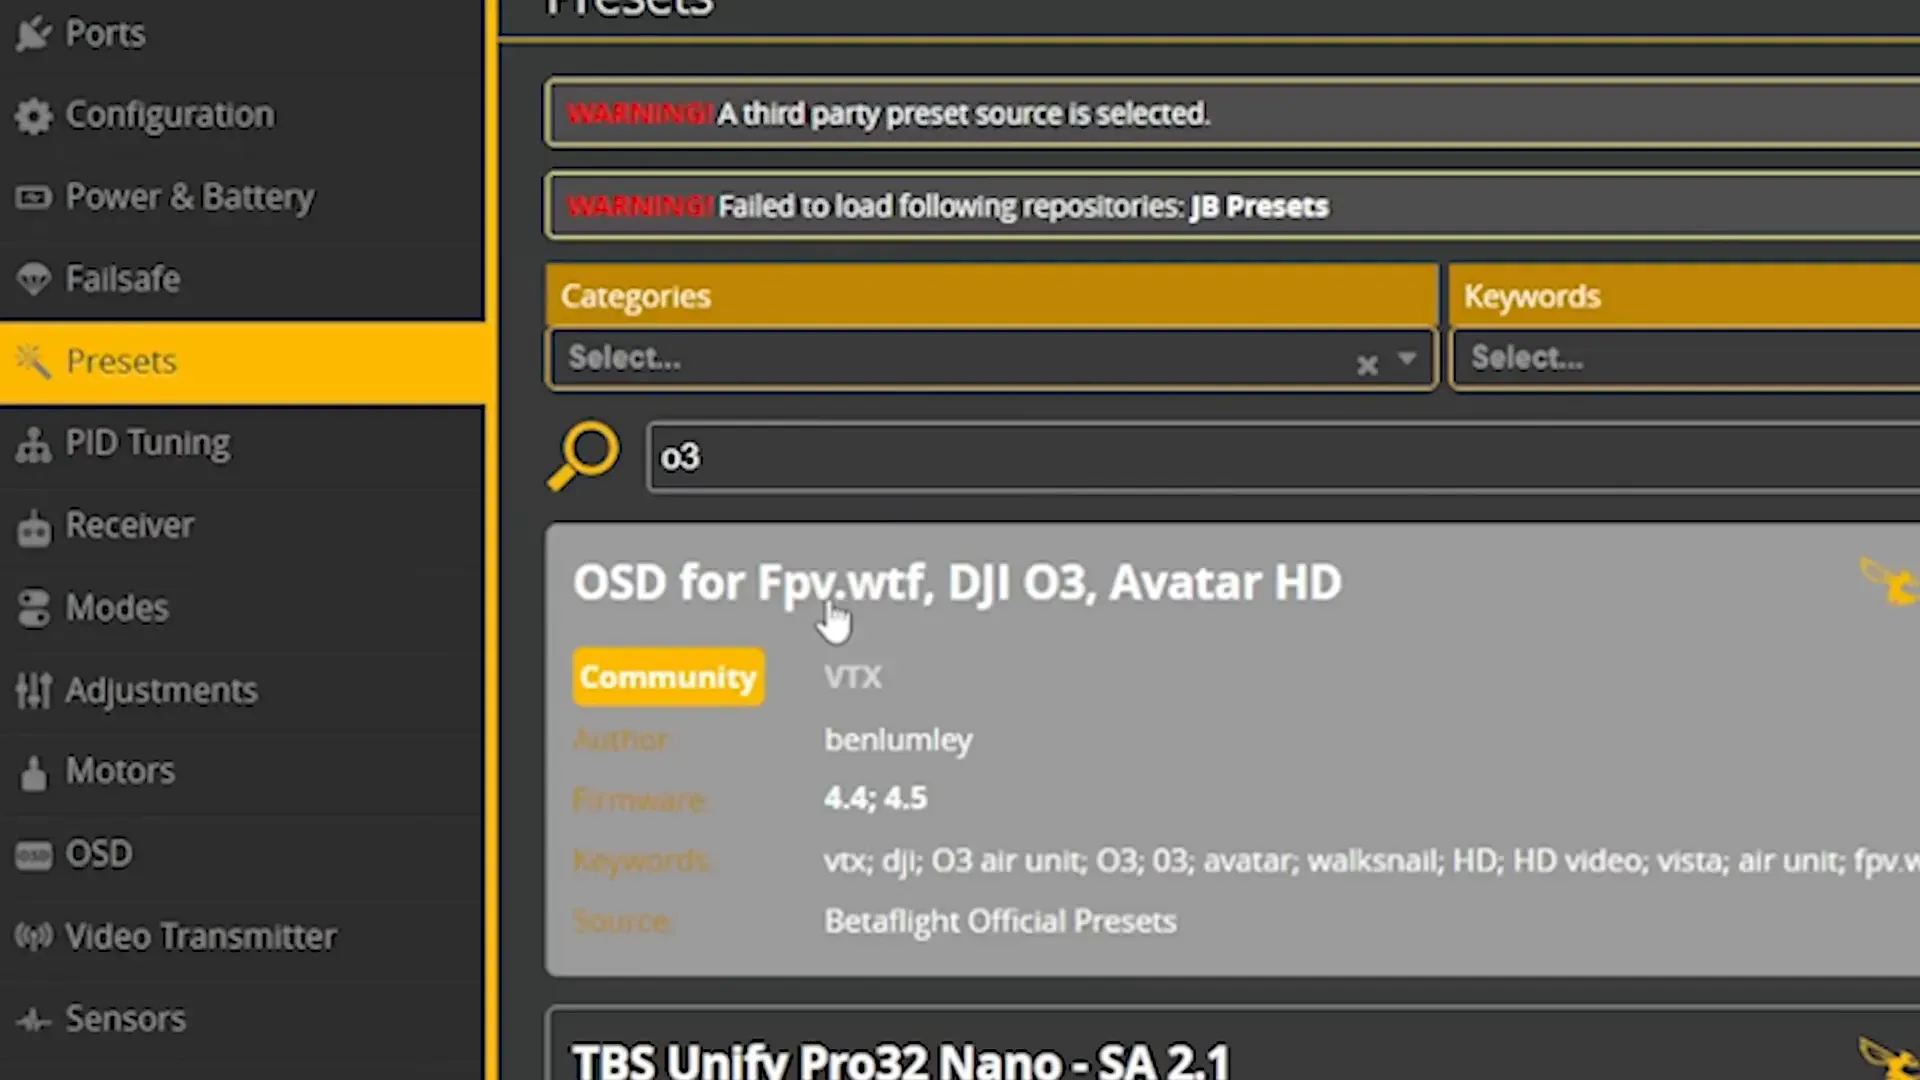
Getting the On-Screen Display (OSD) working requires correct Betaflight configuration. If you’re new to Betaflight OSD, here’s a quick checklist:
- Go to the Presets tab and search for “o3”. Load the preset for FPVWTF DJI O3 and Avatar HD.
- Identify the UART number your video transmitter connects to and select that UART in the preset.
- In the Ports tab, ensure MSP and MSP+DisplayPort are enabled on the correct UART.
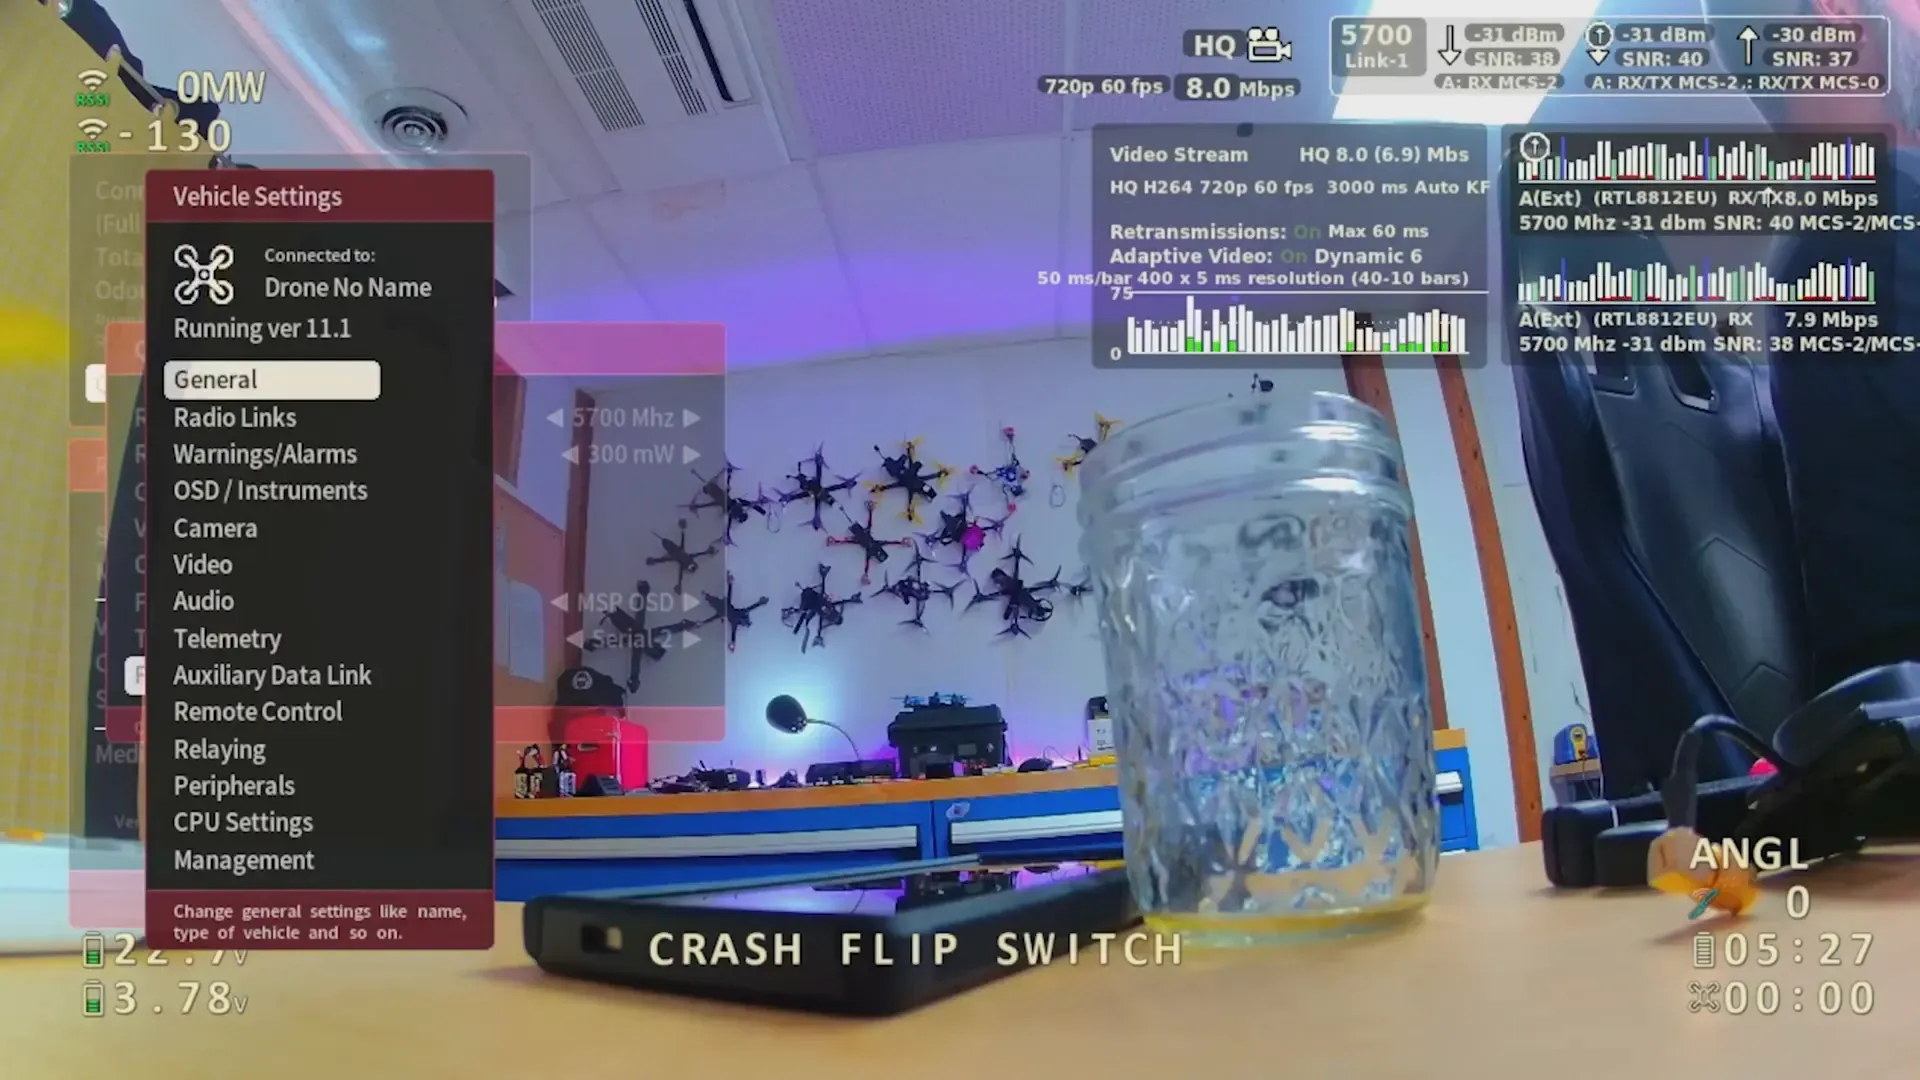
- In RubyFPV’s Quick Vehicle Setup, set the FC telemetry type to MSP OSD and confirm telemetry port matches your UART.
- Remember: RubyFPV counts serial ports from zero, so serial two corresponds to UART three.
Make sure these settings are correct—incorrect telemetry port selection is a common cause of a blank OSD.
Confirming Board Type and Selecting Clean Channels
In RubyFPV’s full vehicle settings, check that the board type matches your air unit. For example, if you have RunCam V2 air unit, do not let it default to a Mario AIO board. Wrong board type means inaccurate VTX power level reporting.
Next, pick the cleanest radio channel to avoid interference. The frequency widget shows spectrum bars:
- White and green bars indicate clean spectrum.
- Red bars indicate interference or noise.
Indoors, expect more red due to WiFi and other electronics. Try different channels and select one with minimal red for best video link quality.
Note antenna tuning: WiFiLink antennas usually peak around 5.6–5.8 GHz. Lower frequencies may degrade antenna performance and could be illegal in your region. Confirm local regulations before switching frequencies.
Wrapping Up: Firmware Flashing Done Right
Flashing RubyFPV to your RunCam WiFiLink v2 video receiver is a necessity, not an option. It improves reliability and unlocks features like SD card booting and OTA updates for your video transmitter.
The process is fiddly—especially entering flashing mode—but following the steps carefully will save hours of frustration. Once done, configuring Betaflight OSD and tuning channels ensures you get the best from your digital FPV setup.
For those interested in real-world performance of RunCam WiFiLink running RubyFPV, check out detailed reviews and flight tests to see how it stacks up against the competition.
Further Reading and Resources
- Zadig Drivers for Cleanflight/Betaflight STM32 Flight Controllers (DFU mode) – Handy if you want to understand driver installations and flashing tools.
- HD FPV Will Blow Your Mind – Insights into digital HD FPV systems and their performance.
- From WiFiBroadcast to WFB-NG: The New Era of Open Source FPV Systems – For a deeper dive into OpenIPC and related firmware projects.
FAQ
Do I have to flash the internal memory to use RubyFPV?
No. RubyFPV supports booting from an SD card image, letting you test firmware without wiping your current setup. However, RunCam disables this by default and you need to flash RubyFPV first to re-enable SD card boot.
Can I flash RubyFPV on macOS or Linux?
This guide covers Windows only. MacOS and Linux users need to find equivalent driver tools and flashing software. Community forums may help with alternative methods.
What if I get the flashing mode timing wrong?
Just try again. The flashing mode requires precise timing on button hold, power application, release, and USB plug-in. It takes a few attempts to nail it.
Will flashing RubyFPV erase my settings?
Yes. Flashing overwrites internal memory and erases previous configuration. Backup any important settings before flashing.
How do I fix a blank OSD after flashing?
Check your Betaflight UART and telemetry port settings. RubyFPV uses zero-based serial indexing, so serial two equals UART3. Ensure MSP and DisplayPort are enabled on the correct port.
Takeaway Box
- RunCam WiFiLink v2 ships with outdated firmware—flashing RubyFPV improves performance.
- Flashing mode requires precise button and power timing—practice makes perfect.
- RubyFPV supports SD card booting, allowing firmware testing without wiping your config.
- OTA updates on the video transmitter simplify firmware maintenance.
- Proper Betaflight OSD setup and channel selection are key to smooth digital FPV operation.
This article was based from the video How to flash RubyFPV to Runcam WiFilink v2 (and initial setup)