Learning how to solder FPV drones is an essential skill for any enthusiast. In this guide, we will explore the best practices, tools, and techniques to help you master soldering, ensuring your drone builds are safe and efficient.
Introduction to Soldering for FPV
Learning how to solder FPV drones is an essential skill for any enthusiast. It’s not just about connecting wires; it’s about ensuring your components work flawlessly together. Mastering soldering techniques will enhance your overall drone-building experience.
The Importance of Proper Tools
Having the right tools is crucial when starting out. A decent soldering iron is your primary tool. Instead of opting for generic hardware store options, consider visiting a local FPV shop for quality equipment.
The TS101 soldering iron, or Sequre SQ-001 are popular choices among FPV builders due to its efficiency and versatility. Pair it with the right tips to cater to different soldering tasks.

Choosing the Right Soldering Iron
When selecting a soldering iron, consider the temperature control and versatility. A good soldering iron should heat up quickly and maintain a consistent temperature. The TS10
for instance, can reach up to 400 degrees Celsius, making it suitable for various soldering tasks.
Having multiple tips for your soldering iron can significantly improve your soldering experience. The I tip works well for finer tasks, while the C4 tip is ideal for soldering battery leads due to its larger size.

Understanding Soldering Tips
Matching the size of your soldering tip to the pad size is essential. Using the correct tip can help prevent overheating and damage to your components. For larger pads, the C4 tip is ideal, while the BC2 tip suits standard pads.
For intricate work, such as on 20x20 flight controllers, the I tip is your best option. This careful selection will lead to cleaner and more effective solder joints.

Essential Soldering Accessories
In addition to a soldering iron, there are several accessories that will make your soldering tasks easier. Items like solder wick, tweezers, and flux are vital for a successful soldering session.
- Solder Wick: Useful for removing excess solder or correcting mistakes.
- Tweezers: Essential for holding wires in place while soldering.
- Flux: Helps improve solder flow and adhesion.

Buying Quality Solder and Flux
Choosing the right solder is crucial. Avoid plumbing solder, as it can damage your electronic components. Instead, opt for leaded solder with a flux core, which is easier to work with.
Sixty-forty leaded solder is a popular choice among FPV builders. It provides a good balance of performance and usability, making your soldering tasks smoother.

Preparing for Soldering
Before you start soldering, ensure you have a solid workspace. Secure your practice board to prevent movement, and apply a light amount of flux to the pads. This preparation is key for successful solder joints.
The process of soldering involves three main steps: flux, tin, and flow. This systematic approach will help you achieve better results.

Step-by-Step Soldering Process
Begin by tinning the pads on your practice board. Heat the pad, feed solder onto it, and quickly remove both the solder and the iron. This technique ensures a smooth, even coverage without excess solder.
Repeat this process for all pads, aiming for a nice covering that’s neither too thin nor too thick. A blob indicates too much solder, which can lead to problems.

Tinning Wires for Soldering
After preparing the pads, focus on your wires. Expose a small section of the wire by pulling away some silicone insulation. The exposed length should match the pad size.
Twist the exposed wire and dip it into flux before tinning. Heat the wire, feed solder, and quickly remove the iron. This step should take no longer than a second, resulting in a light covering of solder.

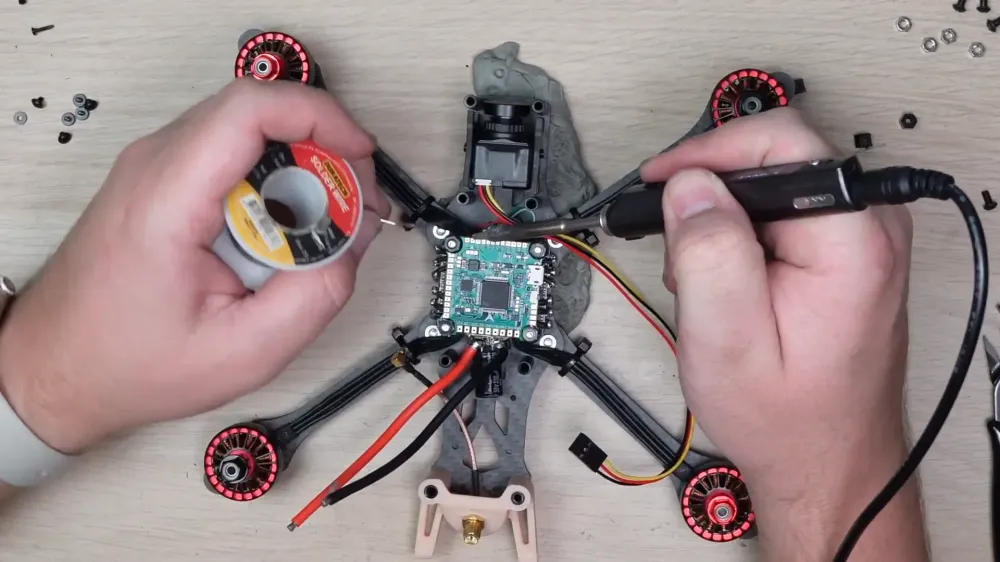
Joining Wires to Pads
When soldering wires to pads, hold the wire in place with tweezers. Apply the soldering iron to both the wire and the pad, allowing the solder to flow and create a solid connection.
Be mindful of the time; larger wires may require a bit more heat application. Keep an eye on the solder to avoid overheating, which can damage your components.

Common Mistakes and Fixes
As a beginner, mistakes are inevitable. If you apply too much solder or accidentally bridge pads, don’t worry. Solder wick can help remove excess solder quickly and efficiently.

Place the wick over the mistake and apply the soldering iron to absorb the excess solder. Always ensure your work area is clean and free of solder blobs to prevent future issues.
Practicing Your Skills
Practice is key to mastering soldering. Using a practice board allows you to refine your skills without risking your expensive components. Repetition will lead to improved technique and confidence.
Remember, each attempt will teach you something new. Embrace the learning process, and you’ll see progress over time.
Practicing on a Soldering Board
To truly master how to solder FPV drones, consistent practice on a dedicated soldering board is crucial. These boards are designed to replicate the various connections you will encounter when building your drone.
Using a practice board like the iFlight Blitz or Diatone Mamba allows you to make mistakes without the fear of damaging your actual components. The more you practice, the smoother your soldering will become.
The Soldering Process: Flux, Tin, and Flow
The fundamental process of soldering can be broken down into three essential steps: flux, tin, and flow. This sequence ensures that your joints are strong and reliable.
- Flux: Apply a small amount of flux to the pad. This helps the solder flow and adhere better.
- Tin: Heat the pad, then feed solder to it, creating a thin layer.
- Flow: Finally, place the wire on the pad, apply heat, and allow the solder to flow, creating a solid connection.

Tinning Techniques for Pads and Wires
Tinning is the technique of applying a thin layer of solder to pads and wires before making connections. This step is vital for ensuring a good bond.
For pads, heat the pad and then feed solder onto it. For wires, expose the wire, twist it, dip it in flux, and then tin it quickly to avoid overheating.

Soldering Wires to Pads
When joining wires to pads, precision is key. Use tweezers to hold the wire in place and apply the soldering iron to both the wire and the pad simultaneously. This allows the solder to flow and create a strong bond.
Ensure that the wire is trimmed to the correct length before soldering. Excess wire can cause shorts, leading to potential damage to your components.

Mistakes and Corrections with Solder Wick
Even experienced solderers make mistakes. If you apply too much solder or accidentally bridge pads, solder wick is an invaluable tool for rectifying errors.
Place the wick over the mistake, apply heat with your soldering iron, and the excess solder will be absorbed by the wick. This method helps keep your work clean and prevents future issues.
Final Thoughts and Encouragement
Remember, mastering how to solder FPV drones takes time and patience. Each practice session is a step towards improvement. Don't be discouraged by early mistakes; they are part of the learning process.
Utilise your practice board to refine your skills and build confidence. The more you practice, the more proficient you will become. Keep at it, and soon you'll be soldering like a pro!