So, the Wizard X220(S) builds are getting harder to come by outside of China, and yet they’re still the generally recommended go to for those looking to get involved with FPV on the cheap (the dream!).
We think, though, that you, and we, can do better. The wizard is a fine piece of kit, but the flight controller is a knockoff, the frame is just okay, the motors are meh at best… We think we’ve come up with an ideal “Source” for getting that FPV fix, still on the cheap, but no longer at the cost of quality components. And this guide will show you just how we put it together, and how you can, too. If you are not familiar with theFPV Source, you can find out more information here
Let’s get stuck in.
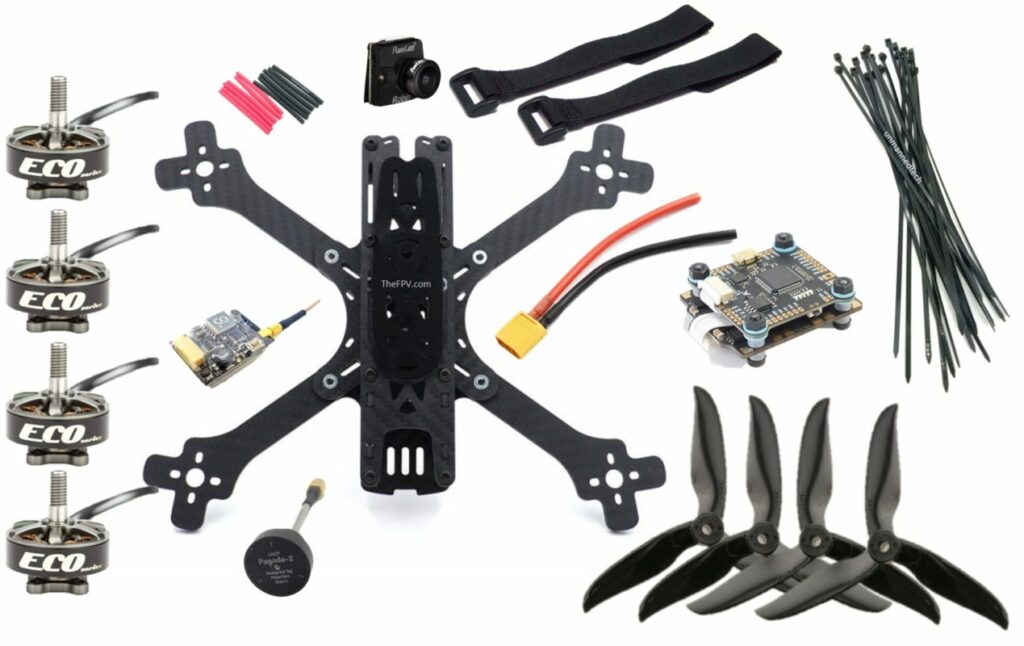
First off, the part’s list:
- Frame: UMT Source One (Based on the open source frame from TBS)
- Motors: Emax Eco 2400kV (for 4s) / 1700kV (for 6S)
- Flight Controller: Diatone Mamba F4 (Part of the Mamba stack)
- ESCs: Mamba Diatone F40 4 in 1 (Part of the Mamba stack)
- Camera: Runcam Robin
- VTX: TheFPV Chaos VTX (25-800mW, VTX Telemetry)
- Miscellaneous: Cable ties, Heat shrink
TheFPV’s Source build is so named because of the frame it is based around (the Source One) and because we believe for many people it is the ideal “source” for their new-found FPV needs.
Building the Frame
Building the frame is fairly straight forward by looking at the photos. Using the included screws you, sandwich the arms between the bottom plate and the cross plate. You can also mount the motors while you are at it.


For now, do not mount the top plate as you will first need to install all the electronics. In the above photo we already mounted the VTX at the back of the frame so you can do this too at this point with a cable tie.
The Flight Stack
The flight stack arrives pre assembled, but we need to disassemble it so that it can fit onto the source frame.


Now you can mount the bottom nylon spacers onto the source one frame, and mount the ESC. We will only mount the flight controller once we have soldered the ESC, otherwise it just gets in the way.


Soldering The Motors
Now you need to solder the motors to the ESC. First cut the motor wires down to size so that they reach the ESC connections (leave yourself about 1cm of extra room to work with). Tin the ends of the cut motors wires with some solder (as this makes them 100% easier to solder to the motor pads). And finally solder the 3 wires to the ESC.


The wire order does not matter, but its best to keep it consistent and it is neater not to cross any wires over one another. Once done, you can secure the wires with a cable tie. Do not cut the front cable ties down as they can double as a receiver antenna mount (as shown later in this guide). Repeat for the remaining 3 motors and hopefully without any drama your quad will look like this:


Now you should solder the XT60 battery lead to the back of the ESC. Make sure you get the polarity correct (red wire goes to +ve, and black to ground). If you get it wrong your quadcopter will go up in smoke when you plug in the battery🔥 .
The Flight Controller
Once the ESC is soldered, you can now mount the flight controller on the top of the stack. Make sure the arrow is pointing forwards. Also connect the white connection cable from the ESC to the flight controller as shown:


The VTX
Now we need to connect all of the other equipment to the frame. To start we will solder the VTX cable to the flight controller. First remove some of the unnecessary wires from the VTX cable. Since we will be powering our camera directly from the flight controller, we can remove these wires from the connector as shown in hte images below. To do this, use some tweezers and gently lift the plastic tab on the white connector, then pull the wire out. For more information check out this tutorial video.


Then you will need to solder the 4 wires from the VTX cable to the flight controller. To start, the yellow wire goes to the pin labeled VIO, and the green wire goes to TX3 (this is used for smart audio). Both these connections are next to the USB port. Then the red wire is soldered to VCC, and the black wire to ground next to it. Once all 4 wires are soldered, make sure you have not shorted any two pads together and then plug the white connector into the back of the VTX.
The Camera
Now we will mount the camera and solder it to the flight controller. First put the Runcam robin into its plastic mount (included with the camera). Then mount the camera onto the carbon fibre camera mounting plates. Take care to mount the camera the correct way around as shown in the images below:

The camera cable is soldered to the flight controller with the yellow wire going to CAM, the black wire to GND, and the red wire to 5V. Once done you can mount the camera to the frame and plug the cable into the back of the camera.


Mounting your Receiver
The last thing is to mount your receiver. Since the kit does not include a receiver the connection will depend on which receiver you are using. But 90% of receivers output SBUS, so you simple solder the signal to the SBUS pad (Rx1), and the 5V, and GND power cables connect right next to it.


If you have a PPM receiver, the signal goes to the PPM pad on the flight controller. If you are using a spectrum receiver, power it via the 3V3 pad, and connect signal to the SBUS pad, as this double as RX1. The receiver antennas can be mounted to the zip ties on the front arms, ans secured using some heatshrink.
That’s it, your quadcopter is basically built. All that you need to do is after you have configured betaflight is to attach the top plate, battery straps, mount your propellers, and the VTX antenna and you are good to go.


Now Install and Configure Betaflight 🐝
We will shortly have a full configuration guide specific to TheSource build, but for now check out our general quad-copter configuration guide that will cover everything you need to know.
Thanks for reading, and hope this guide was helpful. If you run into any issues, start a topic on our forums and we will help you figure it out.